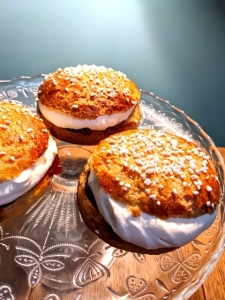
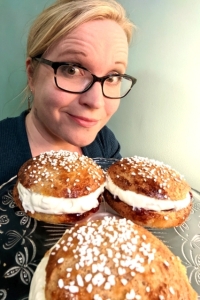
When Pancake Day is celebrated in the UK to mark the start of lent, in Finland Shrove buns are eaten (Semlor in Sweden). They are cardamom buns filled with whipped cream and almond paste or jam depending on which part of Finland you are from. They are typically eaten as a dessert after having pea soup as a meal after being out sledding or going for an outing in crisp winter weather.
We don’t get snowy days typically here in the UK so I have had to settle for the shrove buns and of course I need to make them gluten-free as I am coeliac. Two years ago I posted about making my first gluten-free shrove buns. After this I have learned that I can’t ignore my intolerance to corn and rice even if it would make living as a coeliac easier, and I have created a corn and rice free option of the buns to share with you today.
If you don’t share my intolerances, you can use gluten-free plain flour mix from the shops. I have added this option into the recipe.
Modifications
After the recipe at the end of this post I will give the option to make the recipe dairy free, along with other possible adjustments you want to make. I am yet to experiment if I can make the enriched dough vegan, so can’t promise it will work with egg replacement, but you can of course give it a whirl and if you do, please let me know how it turns out!
Preparing to bake gluten-free
When buying your ingredients, check that they haven’t got any may contain statements for gluten or are marked gluten-free (some dry yeast contains gluten and naturally gluten-free flours can be cross-contaminated, so check when you buy). Also when baking gluten-free things, make sure you use clean surfaces, dishes, utensils, trays and use non-stick parchment paper if there is a chance that a tray has been used for non-GF things.
Recipe
The recipe makes 8-10 buns.
Duration: approximately 2.5 hours ( preparation, mixing dough and forming buns 20 min in total. 2 x 20min resting time + 1 hour proving + 15-20min baking)
Ingredients for the dough
| 250 g (270ml) | Plain Greek-style yoghurt |
| 100g (100ml) | Milk |
| 8 g (1.5 tsp) | Gluten-free dry yeast |
| 15 g (1.5 tbsp) | Psyllium husk powder |
| 4 g (1 tsp) | Salt (use half if using salted butter) |
| 50 g (50 ml) | Sugar |
| 2-3 g (1-2 tbsp) | Roughly ground cardamom (15-20 pods if grinding your own) |
| 5 g (1 tsp) | Vanilla essence |
| 1 | Large egg |
| 50 g | Butter, preferably unsalted |
| 200 g (270 ml) | Millet flour |
| 100 g (200 ml) | Ground almonds (almond flour) |
| 50 g (70ml) | Potato starch |
| 50 g (80 ml) | Tapioca starch |
If you don’t need to be corn and rice free, you can use plain gf flour mix without stabiliser for the whole amount or use 300 g gluten-free plain flour mix and 100g ground almonds for buns that keep for longer.
Ingredients to top the buns
| 1 | Large egg for egg wash |
| Pearl sugar or flaked/chopped almonds for decorating |
Ingredients for the filling
| Appr. 100g | Jam of your preference (strawberry or raspberry are most common) |
| or almond paste | |
| 1 tub/carton | Whipping cream or double cream |
| 30g (or to taste) | Sugar |
| 5g (or to taste) | Vanilla essence |
Method
- Set up the ingredients ready before you start, especially if you are not very experienced in baking.
- Make the flour mix by mixing millet flour, ground almonds and starches together
- Ground your cardamom with a mortar and pestle from pods if you haven’t been able to source ground cardamom. Crush the pods with the pestle, then remove the husks, and grind the seeds so that there are no visible whole seeds. Alternatively you can quickly blitz the cardamom pods with the sugar in a blender for almost a licorice tasting flavour.
- Mix milk and yoghurt. Warm up the yoghurt to lukewarm either in a microwave or gently in a small saucepan. Don’t let it get warmer than just warm to touch so that you don’t kill the yeast when you add that in.
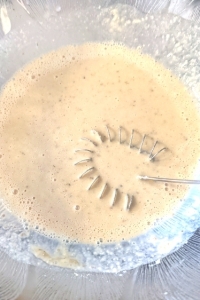
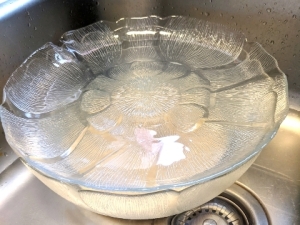
- In a large bowl, mix the warm yoghurt, salt, sugar, vanilla extract, cardamom and 100g of the flour mixture and yeast and whisk together to a slurry. Place the bowl in a warm spot or in some warm water either in the sink or another large bowl/dish and cover with a cloth or plate and let sit for 20-30min until the mixture becomes bubbly and frothy.
- Mix the psyllium husk powder to the rest of the flour mixture.
- Melt the butter either in a microwave (full power for 30-45s or so) or in a small saucepan. Melt it half-way and then let the residual heat melt the rest so that the butter isn’t too hot. Don’t cover it when melting in a microwave as it can spit with force…
- Add the rest of the flour with the psyllium powder mixed in to the frothy yeast, flour and yoghurt + milk mixture. Add the melted butter and egg and mix together to form the dough. Leave rest covered with a cloth/plate for about 15-20min for the psyllium to work and firm up the dough. TIP: If you have forgotten any of the seasoning (salt, vanilla, cardamom) you can add it when mixing the dough. You are welcome 😉
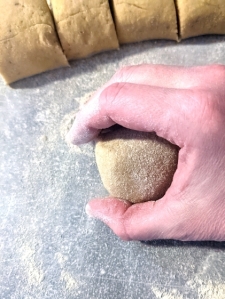
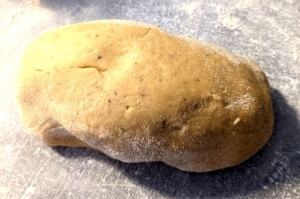
- When the dough has firmed up, sprinkle some gluten-free flour (either millet or other similar gf flour that’s not a starch or plain gf mix if using that) on the worktop and tip the dough onto it. Sprinkle some extra flour on top of the dough and turn the sides to the centre of the dough to shape a ball. If the dough is very sticky, you can knead some more flour in but try to keep the dough soft. Turn the ball over and drag it towards yourself turning at the same time with the other hand to seal any folds. Roll the ball into a sausage shape and using a dull knife or a dough scraper cut the dough into 8-10 pieces.
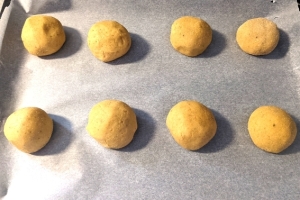
- Sprinkle some more flour on the worktop and flour your hands (again GF flour). Cup your hand on top of a piece of dough and using a circular motion shape the piece into a ball/hemisphere. Place on a baking tray lined with non-stick baking paper. Repeat with the rest of the pieces. You can brush the buns with some water using a pastry brush dedicated for gluten-free baking or just use wet hands to prevent the buns drying whilst proving (which can contribute to the cracking of the buns when baking).
- Cover with a cloth and let rise for an hour, maybe 45min if the kitchen is over 21 C and longer if the kitchen is really cool. The dough doesn’t rise very prominently, it will puff up but too short a prove will result in the buns cracking in the oven, which we want to minimise. Overproving isn’t as much of an issue with an enriched dough as it would be with a bread dough without egg and fat so you don’t need to be that careful with it. Turn your oven on (200C conventional / 180C fan assisted) about 20min before proving time is over.
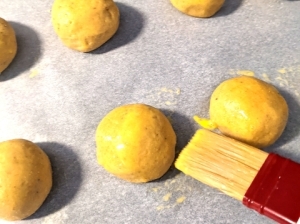
- When proved, brush the top of the buns lightly with egg wash. Beat the one whole egg so that the yolk and white are mixed and then using a pastry brush dedicated to gluten-free baking, dip the brush in the egg and ‘paint’ the buns with it.
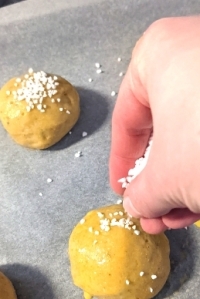
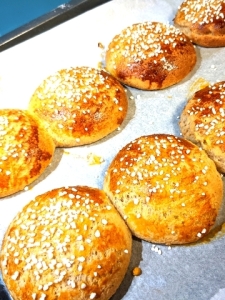
- Sprinkle either pearl sugar or chopped almonds or flaked almonds on top. If you have none of these, you can also sprinkle some caster sugar on top.
- If you have an electric oven, place a metal dish (cake tin or similar) at the bottom of the oven and pour about a cup of boiling water in (boil a kettle, or use a microwave or saucepan). Place the tray of buns in the middle of the oven and bake for about 15min until golden brown. If you make smaller buns they bake slightly quicker.
- Once the buns are cooled, you can fill them: If you are whipping your own whipped cream, use preferably an electric mixer and add the sugar and vanilla essence in and whip the cream until firm enough to stay in shape, be careful not to over whip so you don’t get butter. Check the seasoning, add more sugar and vanilla if you feel they are needed, just remember that the jam or almond paste is sweet. Cut the buns in half, add jam or almond paste to the bottom half. You can carve a little well for the almond paste and mix the crumbs in the whipped cream if you wish – I typically just add the jam or almond paste on the bun. Top with whipped cream and put the top half of the bun on. If you want to make the buns look more fancy, use a piping bag and a piping tip to pipe the cream on.

Using whole psyllium husks instead of psyllium husk powder
You can use either psyllium husk powder or whole husk to make the buns. If you use whole husks, add them in the beginning the same time you mix in the yeast and the spices with the milk and yoghurt. Psyllium husk products can vary in strength so if you feel that the amount of psyllium husk makes a really tight dough that is hard to shape, use a few grams less next time.
Lactose or dairy free buns
If you want to make the recipe lactose free, use lactose free milk and yoghurt and vegetable margarine or lactose free butter to make the recipe and use lactose free whipping cream for the filling. Dairy free margarine and dairy free yoghurt substitutes should work well in the recipe, just adjust the dough if it feels too soft or too hard as the liquid content of the substitutes might differ. You can use a dairy free option of your choice instead of the whipping cream for the filling.
Using shop bought gluten-free flour mix
If you don’t need to avoid rice or corn, you can substitute the flours used with a gluten-free plain flour mix that doesn’t contain stabilisers like xanthan gum or psyllium husk. If the mix does contain them, leave the psyllium husk powder out. You can also use a self-raising gluten-free flour, the baking powder will give the buns some extra rise. You can either substitute the whole 400g to make a nut free version or replace the starches and millet and use 300g of gf flour mix and then 100g of ground almonds.
Substituting millet flour or potato or tapioca starch
If you don’t want to use millet, you can use sorghum flour instead. If you aren’t adverse to corn you can use cornstarch instead of potato starch. If you have trouble finding tapioca starch, you can use the whole amount of starch (100g) of potato or corn starch but you might need to add some more milk in the dough.
Nut free recipe
You can leave the almonds out if you can’t use them. Substitute the almond flour by using 50g more millet flour and 25g more of tapioca and potato starch each to make up the difference or if you use a shop bought gf flour mix just use that for the whole amount (400g). When almond isn’t used, the buns will be more prone to drying out, so they are best enjoyed the same day. You can freshen up unfilled buns quickly by heating them briefly in a microwave or oven if eating the next day.
Troubleshooting
As gluten-free flours differ somewhat based on the producer or where you are in the world (not mentioning the climate conditions..) it can be that your flours absorb more or less liquid than mine did and your dough is either harder or softer. If this is the case, you can add some more milk into the dough little by little and mix it in before you start to form the buns to get a dough that is soft but can still be made into a ball.
If your dough is very soft, you can knead in some more flour like mentioned earlier. However we want as soft a dough as possible, as that gives us buns that stay soft for longer. They might spread out a bit more but you can place them on the tray close to each other so that they touch each other during baking and support each other. I don’t mind the buns spreading out a bit, as it is then easier to eat the filled bun, a classic problem with the Shrove buns (have napkins at the ready).
The buns can crack while baking especially if the dough is quite dry and if they haven’t proved fully when we start to bake them. That is why I have added the brushing with water and a tray of water in the oven to try and minimise cracking. You can also score round the buns a few millimetres deep all round to give the buns a point to expand from but with the soft dough this can prove difficult. I found that giving an hour to prove and having a soft dough and brushing with water prior to proving with the tray of water in the oven minimised the cracks.
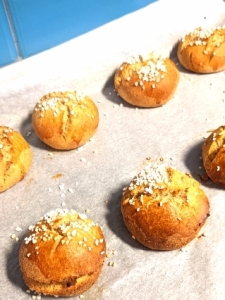
I don’t really mind the cracks as I am all for baking tasty things that delight us in our everyday gluten-free lives rather than aiming for uniform perfection. If you want to make the most perfect buns you can, do use all the techniques suggested to avoid the buns from cracking when baking.
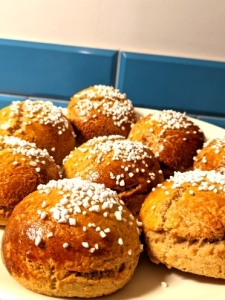
Here is to your gluten-free Shrove bun success!
I hope you are inspired to try to make your own tasty Shrove buns as they really are a treat! I like to have mine with a hot drink but they can also be eaten immersed in a plate of hot chocolate and eaten with a spoon if you want to go all out. Do let me know if you have any questions by commenting in this post or send me an email or find me on my social media accounts, you can find details in my About page.
Follow my blog for further things
I am hoping to give you a recipe for the pea soup so maybe next year you can get the whole Finnish Shrove Tuesday experience (with or without snow), until then, keep practicing making the buns! Do follow my blog to get updates of further posts on gluten-free life, baking and cooking made simpler. If you are interested in further services I offer or my gluten-free bread making online course, see the page for courses and coaching offerings.

One thought on “Gluten-Free Finnish Shrove Buns – Corn and Rice Free Version”