
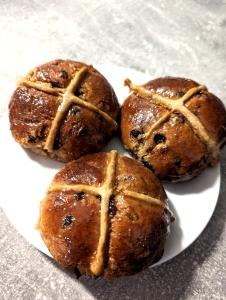
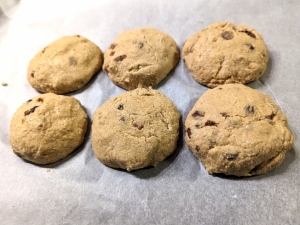
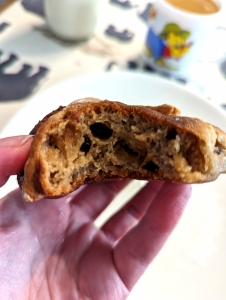
Hot Cross Buns are an Easter tradition I have adopted during the nine years I have lived in the UK. I have not been keen on shopbought hot cross buns even prior to my coeliac disease diagnosis, I have found them too dry and dense. Funnily enough, now that I have experienced homemade gluten-free hot cross buns, I have grown to love them.
I have now adapted my Finnish-style sweet bun (‘pulla’) recipe I have used in my Shrove Buns to make hot cross buns. The recipe uses my own mix of gluten-free flours due to my extra intolerances to rice, corn and GF oats. If you don’t share my intolerances, you can use gluten-free plain flour mix from the shops (like Doves Farm plain flour or one of their bread flours that are on the white side). I have added this option into the recipe. Good Friday is fast approaching, and I would strongly encourage you to give my recipe a go!
Preparing to bake gluten-free
When buying your ingredients, check that they haven’t got any may contain statements for gluten or are marked gluten-free (some dry yeast contains gluten and naturally gluten-free flours can be cross-contaminated, so check when you buy). Also when baking gluten-free things, make sure you use clean surfaces, dishes, utensils and trays. Use non-stick parchment paper if there is a chance that a tray has been used for non-GF things.
Modifications
I have used Lovegrass Ethiopia white teff flour in this recipe, because it’s mild in flavour and has lot of fibre and minerals. As their products are at the moment only available in the UK and Ethiopia, I have added notes on how to adapt when using other brands that might have less fibre. You can also use other gluten-free grains to substitute teff with in this dough, notes on that are available after the recipe.
I will give the option to make the recipe dairy free, along with other possible adjustments you want to make. I haven’t tested this recipe egg free myself, but have heard that the Shrove buns have worked out using flaxseed egg to replace egg. If you give it a go, please let me know how it turns out as feedback is very helpful!
Recipe
The recipe makes six buns, you can make 8 smaller buns.
Duration: approximately 3.5 hours ( soaking fruit minimum hour, but you can even do that the previous evening, preparation, mixing dough and forming buns 20 min in total. 2 x 20min resting time + 1 hour proving + 15-20min baking)
Ingredients for the dough
| 125 g (135ml) | Plain Greek-style yoghurt (50g / ~55ml less if thick set, then add 50g/ml more milk) |
| 75g (75ml) | Milk |
| 4g (0.75tsp) | Gluten-free dry yeast |
| 10 g (1.75 tbsp) | Psyllium husk whole ( 10g/1 tbsp psyllium husk powder) |
| 2 g (1/2 tsp) | Salt (use less, just a pinch, if using salted butter/margarine) |
| 35 g (35 ml) | Sugar |
| 2g (1tsp) | Ground cinnamon |
| 5 g (1 tsp) | Vanilla extract |
| 1 | Large egg |
| 50 g | Butter, preferably unsalted |
| 80 g (115ml) | White/Ivory Teff flour (Lovegrass Ethiopia)* |
| 60 g (80ml) | Potato starch* |
| 60 g (100 ml) | Tapioca starch * |
| 50 g (100 ml) | Ground almonds (almond flour) |
| 100g (120ml) | Mixed fruit (or raisins and orange peel) |
| ~1 cup | Strong tea for soaking the fruit, flavour with 1/2 tsp of cinnamon (or use water with some cinnamon in) |
| ~2tbsp | Neutral flavoured oil (olive or rapeseed for example) for shaping |
*If you don’t need to be corn and rice free, you can use plain gf flour mix without stabiliser for the whole amount or use 200 g gluten-free plain flour mix and 50g ground almonds for buns that keep for longer.
Batter to make the cross
| 45-55g (45-55ml) | Milk or water |
| 40 g | GF plain flour or 20 g (30 ml) teff flour, 10 g (20 ml) tapioca starch and 10g (10 ml) potato starch |
| 0.5g (0.25 tsp) | Psyllium husk whole, just a pinch if using psyllium husk powder |
Sugar syrup to coat the buns when baked
| 50g (50ml) | Caster sugar |
| 25g (25ml) | Water |
Method
- To soak your dried fruit, make a strong cup of tea and add a generous pinch (about 0.5 tsp) of cinnamon to flavour it. You can use water with cinnamon in if you prefer not to use tea. Soak the fruit minimum of 1h but you can also start soaking the fruit the night before to get them really nice and plump.
- Mix the tapioca and potato starch together in a small bowl, set aside for later.
- Combine teff, ground almonds, psyllium husk (whole husk or powder), dry yeast, cinnamon, sugar and salt together in a bowl.
- Mix milk and yoghurt and add the vanilla extract. Warm up the mix to lukewarm either in a microwave (about 30-45 seconds on full power depending on the microwave) or gently in a small saucepan. Don’t let it get warmer than just warm to touch so that you don’t kill the yeast when you add that in.
- Drain the soaked fruit well using a sieve dedicated for gluten-free duty. Discard the tea.
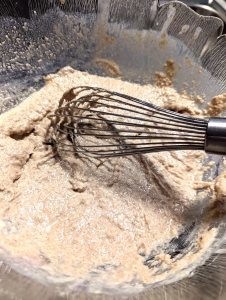
- In a large bowl, mix the warm yoghurt and milk mixture and the flour mix with teff ground almonds etc. to form a slurry (can be quite thick). Place the bowl in a warm spot or in some warm water either in the sink or another large bowl/dish with warm water in and cover with a cloth or plate and let sit for 20-30min until the mixture shows some yeast action (slightly puffed, can show some air bubbles but can be hard to see if the mixture is quite thick.
- Melt the butter either in a microwave (full power for 30-45s or so) or in a small saucepan. Melt it half-way and then let the residual heat melt the rest so that the butter isn’t too hot. Don’t cover it when melting in a microwave as it can spit with force…
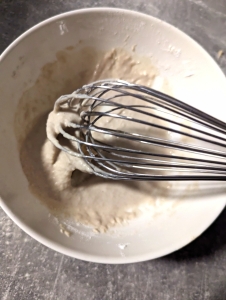
- Add the egg, melted butter and starch flours to the dough, whisk thoroughly with a ball whisk to break up any lumps. You can also squish mixture with your hands to make sure it’s nice and smooth.
- Mix your fruit in the dough, make sure they are well dispersed in the dough, use your hands when necessary.
- Leave to rest covered with a cloth/plate for about 15-20min for the psyllium to work and firm up the dough.
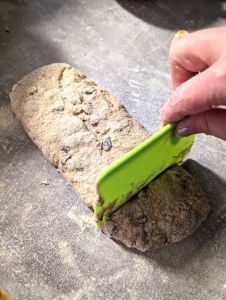
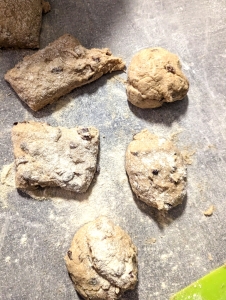
- When the dough has firmed up, sprinkle some gluten-free flour (teff or plain gf flour mix) on the worktop and tip the dough onto it. Sprinkle some extra flour on top of the dough and flour your hands and form a narrow rectangle/oblong using your hands or dough scraper. If the dough is totally running away from you, add some extra flour and massage it in the dough to make it firm enough to cut and shape, but we want the dough to be as soft as possible. Cut the dough into 6-8 pieces.
- On a clean part of worktop use some mild flavoured oil (olive oil or rapeseed oil without added extra foaming agents etc. are my picks). You can use GF flour, but it can dry out the surface of the bun if using too much. With this sticky dough oil works better, I find.
- Cup your hand on top of a piece of dough and using a circular motion shape the piece into a ball/hemisphere. Place on a baking tray lined with non-stick baking paper leaving a gap of about 15mm (roughly 1/2 inch) between the buns. We want them to get support from each other when expanding in the oven but not to be totally stuck to each other to gain the right shape. Repeat with the rest of the dough pieces.
- You can brush the buns with some water using a pastry brush dedicated for gluten-free baking or just use wet hands to prevent the buns drying whilst proving (which can contribute to the cracking of the buns when baking).
- Cover with a cloth and let rise for an hour, slightly less if the kitchen is hot (about 23C+) or longer if your kitchen is below 20C. The dough doesn’t rise very prominently,we will want it feeling slightly puffy and inflated. Too short a prove will result in the buns cracking in the oven. Turn your oven on (200C conventional / 180C fan assisted) about 20 min – 30 min before proving time is over.
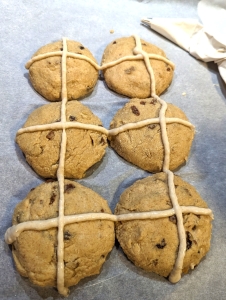
- About 15min before end of proving make your batter for the cross – mix together the psyllium husk powder and flour, and start with the smalles amount of liquid and add more if the mixture is very thick. Too thick a batter will go hard in the oven, so if the mixture feels stiff, add some more milk. You want the batter to be pipeable, so it can’t be too runny, either. Gluten-free flours and different brands and batches of psyllium husk absorb water differently, so at this point you will need to experiment a bit with it. We want a mixture that is similar viscosity to thicker caramel sauce.
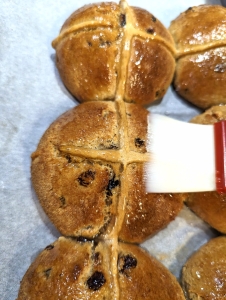
- When your buns have proved, make your cross over the buns. Use a piping bag and a plain nozzle of approximately 5mm, or a cone made with non-stick parchment with the tip clipped off. Go over the buns slowly, so that the batter also flows down the side of the bun slightly before moving over to the next bun. I like to do my long lines over the rows of buns to get the feel for how the batter handles and then do the shorter lines over each pair of buns.
- Sprinkle some water on the baking tray. Place the tray of buns in the middle of the oven and bake for about 25 min until golden brown. To make sure your buns colour evenly, you might need to turn the tray around half way.
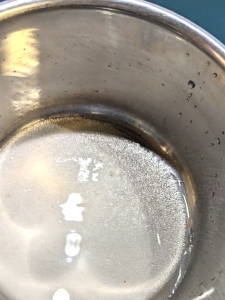
- When the buns are baking, make your sugar syrup to glaze the buns: Combine the water and sugar in a small saucepan and heat medium to high power on the hob until the sugar crystals have dissolved. Turn hob of and leave to cool down slightly. If the solution should happen to crystallise when waiting, reheat again.
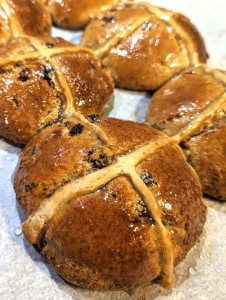
- When the buns have baked, let them cool down for ten minutes or so before brushing on the glaze using a dedicated gluten-free duty pastry brush.
- Wait for 10-20 more minutes for the buns to cool down and firm up a bit so that they don’t feel too doughy – the starch flours turn liquid in the heat of the oven and they need to recrystallise. Cut in half and enjoy with butter or eat as is without butter, that’s my preferred way!
Using a scale recommended
Using kitchen scales to weigh out your ingredients is highly recommended in gluten-free baking. This is due to accuracy being important and also different types of flour, as well as whole psyllium husk compared to psyllium husk powder have different weights. I have added volumes so that you can have a go making the buns even if you haven’t got scales at the moment, but it can be that the dough consistency will need some adjusting (more flour if very loose, more liquid if very tight and unmoldable).
Using whole psyllium husks instead of psyllium husk powder
You can use either psyllium husk powder or whole husk to make the buns. As we are letting part of the flour sit with the liquid and yeast at the start, mix the psyllium with the flours whichever type you are using. Psyllium husk products can vary in strength so if you feel that the amount of psyllium husk makes a really tight dough that is hard to shape, use gram or two less next time. If the dough is really loose and doesn’t keep it’s shape even if you add some more flour, you could use a gram or two more next time.
Lactose or dairy free buns
If you want to make the recipe lactose free, use lactose free milk and yoghurt and vegetable margarine or lactose free butter to make the recipe. Dairy free margarine and dairy free yoghurt substitutes should work well in the recipe, just adjust the dough if it feels too soft or too hard as the liquid content of the substitutes might differ.
Using shop bought gluten-free flour mix
If you don’t need to avoid rice or corn, you can substitute the flours used with a gluten-free plain flour mix that doesn’t contain stabilisers like xanthan gum or psyllium husk. If the mix does contain them, leave the psyllium husk powder out. You can also use a self-raising gluten-free flour, the baking powder will give the buns some extra rise. You can either substitute the whole 200g to make a nut free version or replace the starches and teff and use 200g of gf flour mix and then 500g of ground almonds.
Substituting teff flour or potato or tapioca starch
If you don’t want to use teff, or it is hard to find it, you can use sorghum or millet flour instead. If you aren’t adverse to corn you can use cornstarch instead of potato starch. If you have trouble finding tapioca starch, you can use the whole amount of starch (100g) of potato or corn starch but you might need to add some more milk in the dough and the buns will dry out more easily.
Nut free recipe
You can leave the almonds out if you can’t use them. Substitute the almond flour by using 30 g more teff flour and 10 g more of tapioca and potato starch each to make up the difference. If you use a shop bought gf flour mix just use that for the whole amount (250g). When almond isn’t used, the buns will be more prone to drying out, so they are best enjoyed the same day. You can freshen up unfilled buns quickly by heating them briefly in a microwave or oven if eating the next day.
Troubleshooting
As gluten-free flours differ somewhat based on the producer or where you are in the world (not mentioning the climate conditions..) it can be that your flours absorb more or less liquid than mine did and your dough is either harder or softer. If this is the case, you can add some more milk into the dough little by little and mix it in before you start to form the buns to get a dough that is soft but can still be made into a ball.
If your dough is very soft, you can knead in some more flour like mentioned earlier. However we want as soft a dough as possible, as that gives us buns that stay soft for longer. We are placing them near each other on the tray so that they can spread out a bit but then gain support from each other when baking and expanding upwards.
Hope you enjoy this recipe!
I really hope that this recipe of mine is encouraging you to make your gluten-free hot cross buns fresh from scratch! There are a few steps and ingredients but I promise you the flavour will make up for the extra effort! If you have any questions about the recipe or sourcing ingredients etc, do ask by commenting in this post. The other options are to send me an email or find me on my social media accounts and sending me a direct message, you can find details in my About page. I would love to hear how you get along and if there is any troubleshoothing to be done, do let me know, I have tried to cover all sorts of eventualities but there might be some situations (like working with different ovens) that I haven’t covered here.
Follow my blog for further things
To get updates of further posts on gluten-free life, baking and cooking made simpler, give my blog a follow! If you are interested in further services I offer or my gluten-free bread making online course, see the page for courses and coaching offerings.
